If you are thinking of starting your own blog and want to know the How to Start a blog. So you are at the right place, through this article I will try to give you all the information about blogging in simple words. If you do not have any experience and you are a beginner then this article is going to be very beneficial for you.
Because you will get all the information in one place. From writing a blog to earning money from it, the details are included in this article. Initially, you must have doubts whether people even read blogs because youtube has already made everything easy. So the answer is yes, there are many people who read blogs, so you can get rid of this worry.
Choose the Right Blog Topic.
Table of Contents
The first and foremost thing is to understand the audience. To know what she wants to read or likes. You write a blog and if people do not want to read it and do not search about it, then there is no use for you to write.
What is the topic of the blog, it decides your success. It is easy to start a blog but not everyone is able to get it ranked on the web, due to which the blog does not run properly.

How to choose a blog topic?
Before writing on your topic, get good information on it so that you can write well.
Many people’s blogs are not able to run because they fail to choose the right topic. So along with being aware of your chosen topic, you should also know whether people want to read it or not.
If you choose a topic on which a lot of content is already available, then it becomes difficult to rank your blog when you are a new blogger. And among all the content, your content gets lost so that it does not reach the readers.
The step that comes after choosing a topic is keyword research. Doing keyword research helps us to know whether people search for the keywords you are including in your content or not. In other words, their search volume is good or not. This will let you know whether people want to read your content or not.
Suppose you want to write on the fashion niche, then you search from your topic, how is the search volume of related keywords.
There are many online tools available for keyword research. Ahref keyword explorer, google keyword planner, KW finder, SEMrush etc are some tools. Many of these are paid tools for which you will have to pay a monthly fee. Don’t worry, there are some tools that you can use for free. WMS Everywhere and google keyword planner are free tools.
Another way is to type in the search bar of google.com – top 10 (your niche or topic) blogs. After this, if you open any result then you will get the best blog. You have to check the traffic of any of those websites.
In simple words, you have to know that how many people visit that website and see it.
You can use a similar web tool to do this work. With the help of this tool, you can know how much traffic comes from a website to google every month. Also, you can also know what is the traffic source or from where the traffic is coming. Similar web tool is a free tool.
By now you will know whether people want to read your chosen topic or not. If yes, then think about whether you will be able to write about fifty posts on that topic or not. If yes then you are ready to start a blog.
Along with starting a blog, it is important that you also have content for it. If you cannot write that much content then you should leave the idea of writing on this topic and think about some other topic.
If you are not able to think on which niche or category to write, then to make your problem easier, I am writing down some popular topics. If you want, you can create a blog on any of these topics, about which you are aware.
>Sports
>Bollywood
>Career
>Science
>Technology
>Beauty
>Fashion
>Health
I hope you have understood about the topic. And now you will be able to think of a good topic.
How to Register a Domain for your Blog?
You need a domain name for your blog to have an online presence. If someone wants to access your website, for that domain name will be required.
If a user enters your domain name in the search bar, then your website will open.
What is Domain?
If you do not know what a domain is after all, then let us know.
Just as we should know its address to access any place, in the same way we should know its domain name to access any website.
This is a part of the url. For example, suppose a url https://www.xyz.com contains xyz domain name.
How to choose a domain name?
While choosing a domain name, it should be kept in mind that after reading it, anyone can guess what your website is related to. The viewer should understand what content he is going to get on the website.
Just as we create an image by listening to a name, how a person will be, in the same way domain name can also make an impact on how the content will be.
Along with all this, also keep in mind that the domain name of your website should be related to your niche.
There must be such a word in the domain name which is the keyword of your niche.
Do not put more than two or three words in the domain. This will make it difficult for people to remember him. Keep its length so that if people want to read the blog on your website, then they can easily reach it by typing. You can also use domain name generator.
This is a tool that can solve your problem of thinking of a domain name.
First of all go to google.com. Then go to the search bar and type domain name generator.
Click on any website that came in the results. Now you will see a search bar. In that you type the keyword of your blog. You will see many suggestions in the results.
In front of some suggestions, you will see buy written next to WHOIS and some. Whose buy will be written in front of them, no one has used them yet. You can register any of those domain names.
In front of whom WHOIS is being written, someone must have already registered them. Now you have learned a lot about domain name.
How to buy Domain Name?

Now let’s know how to buy or register a domain name. There are many websites that help in this work. These websites register your domain. Some websites register for free. These websites do this to increase their sales. While some websites charge you for this work.
So you should know which website you will be using. If you are not getting any such website then you can also register domain from godaddy. Hosting on this website can be easily combined with the domain.
On this your work will be done easily. Let us know step by step how to register domain on godaddy.
First of all, you enter the url of godaddy in the search bar of your browser which is – https://in.godaddy.com/ website will open
Now you will see a search bar. In that you enter the name of your domain and click on the search option.
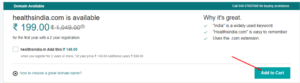
Now you will see domain names and the option of “Add to card” next to them. Click that. Your domain name will now be added to the cart.
Now the option of “View to cart” will appear, click on it.
From here you will now be able to buy your domain name.
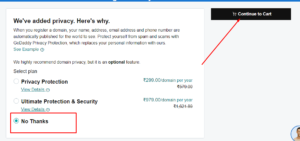
If you want more features with this, then you can choose from the options shown. If you don’t want then click on “No thanks” option and then click on “continue to cart”.
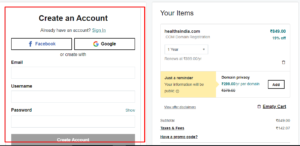
Now you have to create your account on godaddy, for that you have to fill your details in the form shown.
In the end all you have to do is pay. Pay the price of your domain. You can make payment very easily with the help of UPI. After the payment is completed, you will get a mail on your email id on which you will be informed that your domain has been added.
What is web hosting?
If you do not know what is web hosting then today you will understand. To bring your website online, you need web hosting. Whatever files will be on your website (pdf, vedio, images etc.) are on the host’s server itself. This gives them space to save.
Many companies provide the facility of web hosting. Some of these are-
- Hostinger
- Blue host
- Dream host
- Hostager
- A2 Hosting
Now the next question will be coming in your mind that which company to use. For your simplicity, let me tell you about two companies. You can take hosting from them for your blog. So first of all let me tell you about Hostinger.
This is an affordable company to buy web hosting. With this you can start your first blog. It is also easy to pay on this. You can easily do this with the help of UPI. And if you want, you can also use your debit card.
Let us now know in detail how to buy web hosting on Hostinger?
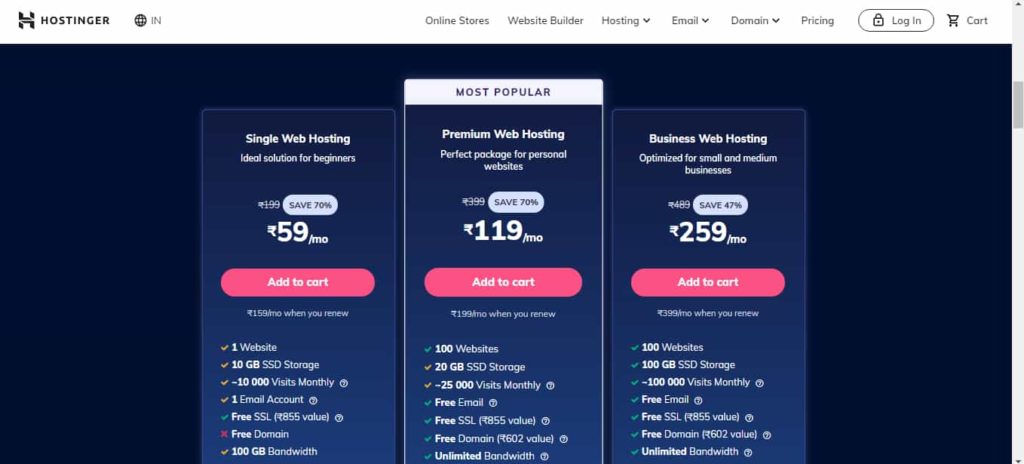
First of all you will go to its website. For that you can click on this link – Hostinger.in. The website will open. Now you have to choose your plan accordingly. In this you will get three options – Single Web Hosting, Premium Web Hosting, Business Web Hosting.
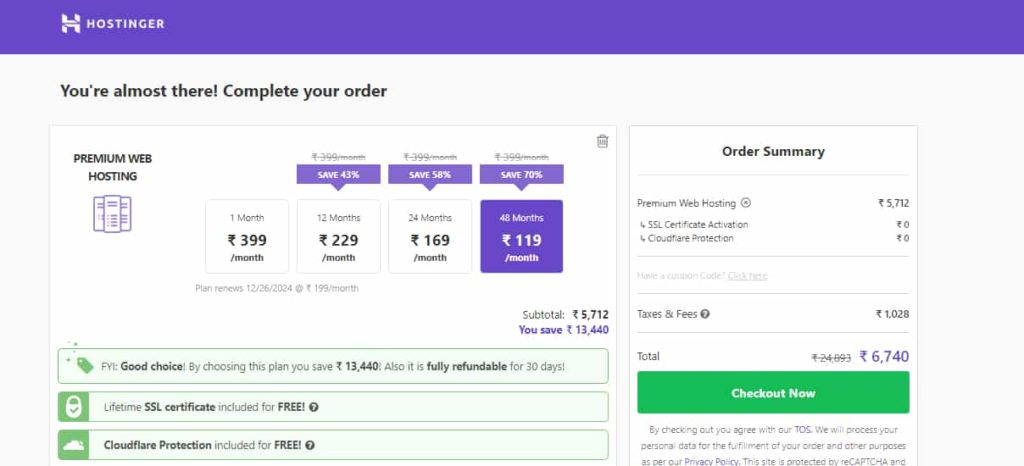
If you take premium web hosting, then you will have to pay ₹ 199 / – per month for 48 months. You will find the facilities of all three options written under them. You choose the plan of your choice. For this click on “add to cart” option. The next window that opens will be the payment key.
Before this, you should keep in mind that your account has been created on Hostinger. Now fill the details of the payment and do it. If you have taken a premium web hosting plan, then you will also get a free domain with it.
The name of the domain you want is to be filled in the box with the name domain. After that make the payment. Now you will get a confirmation mail. In that you will get the username and password of Cpanel. You have to connect domain and hosting.
How to setup Blog?
First of all go to the dashboard of your blog. Then type WP-Admin next to the domain in your browser. This way –
“http://www.yourdomain.com/Wp-Admin”
Now a page will open in which you will have to give your e-mail I’d and password which you must have entered while installing hostinger.
Now enter your site name in the dashboard that will open. In this the default site name is written. For this reason, when you open your website, you get a title named My site. To change this, you have to go to the settings.
After this go to General settings and change the site name and tagline. Now you have to change the parmalink in the settings itself. Permalink or Permanent link has two parts – domain and then slug. First you see that link-
http://www.yourdomain.com/2020/06/Page-Name।Html
You edit it and write this –
http://www.yourdomain.com/Page-Name।Html
How to Apply Theme on Blog?
Along with good content, it is also very important that your blog looks attractive. It is obvious that if this happens then people will look at your page with interest. To make your blog look good, you should apply a good theme.
You may have to spend money but think of it as an investment. First of all open the dashboard of wordpress. Click on the Appearance option visible there. After that click on Add Theme.
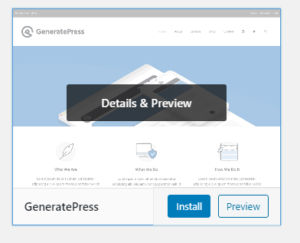
In the search box, type Generate Press. (You can also write the name of any other theme according to you.) Now click on the Install button. This will install this theme. After this, click on Activate option to apply the theme on the blog.

Now Generate Press Theme will be installed in your blog. To check whether the theme is installed or not, click on the refresh option. When you go to any website, you will also see the menu. In which there are different options for your help and convenience.
Along with the theme, there should also be a menu on your website to make your website look professional. Click on Appearance to create a menu. Then click on Primary Menu. Now write the options you want to add in the menu. You can also add pages to the menu.
It is necessary to create four pages mentioned below. To get approval from Google Adsense, it is mandatory to have these four pages on your website –
About Us
Disclaimer
Privacy-Policy
Contact Us
If approval is not given then you will not be able to earn money.
Click on the + icon above to create these pages. Now click on Add new page. After this, enter the name of the page you want to create in the title. Now just write about it.
If you do not understand what to write, then you can also search on google. You will find many such websites in which you will get content to write.
How to Install Plugin on Blog?
The plugin further enhances your user experience. Even if you do not have much technical knowledge, you can easily install plugins on Word Press. Now let us see which plugins should be installed in the blog.
Make sure that you only install the necessary plugins. If there are more plugins then the load on your website will increase. So keep less plugin, it will be good for your website’s efficiency and speed. If your work can be done from any source code, then do it from that.
To install the plugin on the blog, click on the Plugin option. After that click on Add new Plugin. In the search box, type the name of the plugin you want to install and search.
Now you will see the list. Now you have to click on the Install button in front of the plugin of your choice. Now it will be downloaded on WordPress. Now Activate will come instead of Install option, click this.
Below I am giving a list of some important plugins that you should install.
- Yoast SEO
- Wp Super Cache
- Akismet
- ShortPixel
Yoast SEO- This plugin helps us related to SEO. It improves the content and keywords of your website and helps in improving ranking.
Its both free and paid versions are available. Features are limited in the free version but you can take it at the beginning of the blog. Later, if you want to take Yoast SEO Premium, you can take it.
ShortPixel- This plugin compresses the images of our website. We should upload images of lesser size and it helps us in this.
Akismet- With this plugin you can remove spam comments. It may take you time to delete spam comments like this.
WP Super Cache- The loading speed of the website can be reduced due to WP Super Cache plugin helps to overcome this problem.
How to Install SSL Certificate for Free?
If you do not know what an SSL certificate is, then it is a kind of digital certificate. Which tells your website secure. The full form of SSL is Secure Sockets Layer. After getting the SSL certificate, “https” will be written in place of “http” in front of the url of your website and the sign of Pallock will also be visible.
This would mean that your connection is secure. With this, your website will be able to open from every browser. By taking hosting from Siteground, you can get SSL certificate for free. First of all open Siteground’s website. After that click on security option and then click on SSL manager.
Now add the name of the domain on which you want the SSL certificate to the select domain. Click on Let’s encrypt option under “Select SSL”. After that click on get option.
Now enable HTTPS Enforce in SSL Manager. Refresh your blog and check whether https came instead of http in the url.
Google Analytics
While running your blog, you should also know your performance so that you can make efforts in the right direction.
Google Analytics can help you in this. This is an amazing feature of Google Marketing Platform. Anyone who has a Google account can use it for free. This will give you a complete report of your website. On this you will know how many people have visited or visited your website, time to read post, time to stay on website etc.
To see the information of your website, your website will have to be linked to Google Analytics. To link, you have to put the track code of your Google Analytics in the theme of the website.
Let us see how to create an account in Google Analytics and link to that website.
We may view website information as long as the Google Analytics track code is attached to the website. If the track code is removed from the website then we will not get the report. How to create an account on Google Analytics?
First of all go to Google Analytics website. For this click on this link – https://analytics.google.com/analytics/web/
Click on Get Started. Now you have to type your name in your account name. Or if you want, you can also enter the name of your website.
You are creating an account on Google Analytics for your website, so now click on web.
Now next you have to type the name of your website as Website name. In Website Url, copy and paste the url of your website and fill it.
Now you select India instead of country. Here you have to give the name of the country from where you are running the website.
Your Google Analytics account will now be created.
After the account is created, you will get the tracking code which you have to add to your website. If you do not find the tracking code, click on Admin, then click on Properties. Now you have to click on Tracking info. After that click on tracking code. Now paste your tracking code under the <head> tag in the theme of your blog.
Google search console
Google search console is also called webmaster tool. The reason for this is that earlier its name was Webmaster tool only. People use Google to search almost everything.
To increase traffic to our blog, we have to take its help. Google search console is a free service from Google that helps you to see how your website looks on Google. It is also an awesome SEO tool. Google Search Console helps us to index our posts in Google.
First you need to create an account on Google Search Console. First of all open the website of Google Search Console or click on this link –
First of all type your domain and click on continue option. Now you have to do owner verification. For this, copy the given meta tag and write it inside the <head> tag of the theme of your website.
After this you need to submit the site map of your blog. Open the Google search console and click on the sitemap option on the left side. Now type sitemap.xml followed by your domain in the blank given below ‘Add a new site map’. And click on submit button.
Now your work is done. Now your posts will be indexed on google.
Google Adsense
To earn money from your website you must know about Google Adsense. It will help you to earn money. After Google Adsense is approved, ads will run on your website.
Your earning will start when people click. You do not have to apply for Google Adsense immediately after starting a blog.
First of all, create the four important pages mentioned above and put them in your website. After this you have to write 15-20 posts. Each post must be 1000 or more words. Keep in mind that your posts should be 100% unique.
After all this, you can apply on Google Adsense. Within 24-48 hours of applying, you will get an e-mail from Google Adsense and you will get approval from their side.
Now you can put advertisement on your blog and earn money. When you have $ 10 in your Google Adsense account, then you will have to do address verification. For this you must have a pancard. On completion of 10 $, click on the red heading at the top and complete the process of address verification with the help of your pin card.
When $100 is completed in your account, then it will be transferred to your account. For this you can also do affiliate marketing to earn more money from your bank account’s de blog. For this, you have to share the links of the products on your page. When people buy the product from that link, then you will also get the commission of the sale.
I hope that you have liked this article which is based on “how to start a blog”, and got all the information related to blogging that blog step by step. Now that you all know, you can start blogging career very easily.